"Things won are done,
Joy's Soul lies in the Doing."
- William Shakespeare

Monday, October 31, 2011

It's What's on the Inside

I've only time for a quickie this morning, fine friends, but it's a good bit of love to share.  You may recall that I mentioned something about electric watermelon radishes in my last post.  These are a new-to-me discovery, thanks to our CSA delivery.  When I opened our box, here's what I pulled out:


A rather unassuming veg, no?  I actually thought it was a turnip, until I saw the list of goodies.  Hm.  So, it turns out, our mothers were right.  (Don't tell them that, though.)  It's most definitely what's on the inside that counts.  Check this baby out: 


You see why I call them electric.  These gorgeous radishes are nothing short of psychedelic.  Well, okay, they're a bit short of that, seeing as they don't cause hallucinations.  But you get my drift.  Food should always be pleasing to the eye, and fun to eat, and in my mind (at least if I'm doing the cooking), simple and straightforward.  What could be simpler than slicing some radishes, sprinkling them with a little coarse sea salt, and serving them with a bowl of melted butter, a la francais?


The taste of these wonderful treats is crisp, clean, and well, rather like a radish.  But, and perhaps this is because I'm eating with my eyes as much as my mouth, I could swear they taste just a wee bit sweeter, and more delicate, than your everyday variety.  And if my eyes are tricking my mouth, who am I to complain?

If you can get your hands on some, they will not disappoint.

Happy Halloween!

Thursday, October 27, 2011

Out of the Box, Take 9

We just had our very last CSA delivery for the season, and it was bittersweet.  Bitter, obviously, because it's the last.  Sigh.  I am so going to miss those beautiful, organic vegetables arriving weekly, like a long-lost friend.  And sweet, because there were some delicious foods in there.  I consider myself fairly vegetable savvy, or at least I did, until lately, when I was pleasantly surprised to discover the gorgeous wealth of the fall harvest.  Who said the only colorful, exciting veg comes in summer?  No way, my friends, we've been eating well.  From electric watermelon radishes (I'll have those for you soon!), to rainbow chard (which, yes, my kiddos are get slightly tired of, but not me!), to colorful squashes and potatoes, leeks and broccolini...oh my.  Good stuff.

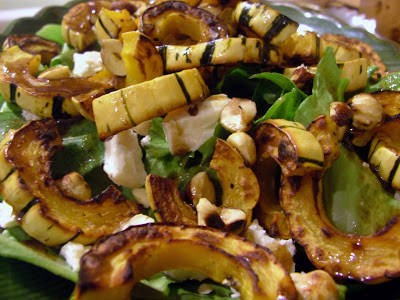
So last night, for the first time, I had Delicata Squash, and I must sheepishly admit, I wasn't sure exactly what to do with it.  That's what the internet is for, though, right?  So, I looked it up, and discovered that while it's a winter squash, it possesses a more tender skin, that doesn't need to be peeled.  Nice, less work?  Count me in.


When roasted, Delicata Squash tastes somewhat like Butternut, but perhaps even a bit sweeter.  The skin gets a nice crunch to the edges, while the flesh caramelizes with its roasting time in the oven. Scrumptious.

I had some escarole, also from our box, which had nice, sturdy leaves, and, once the ribs were stripped, a pleasingly subtle bitterness.  Reminiscent of radicchio, but less bitter.  (The ribs were a little aggressive, so I tossed them.)  Along with some feta in the fridge, toasted hazelnuts, and a quick balsamic-honey vinaigrette...dinner was on!

Here you go:


Autumn Salad of Roasted Delicata Squash, Escarole, Feta, and Hazelnuts
serves 2 as a main, or 4 as a side

Ingredients
1 or 2 Delicata Squash, about 1 or 1 1/2 lbs total
escarole, or other robust salad green
1/4 cup hazelnuts, toasted in a dry pan, then coarsely chopped
1/4 cup feta, broken into bite-size chunks

Balsamic-Honey Vinaigrette
2 tsp grainy dijon mustard
2 Tbs good balsamic vinager
1 Tbs honey
4-6 Tbs good olive oil, to taste (I prefer my dressing on the tart side, so use less oil)
1 clove garlic, minced
generous pinch Maldon sea salt, or kosher salt, and freshly ground black pepper

Preheat oven to 375 deg F.

To prep the squash, first slice off the ends, then slice in half, lengthwise.  Using a spoon, scoop the seeds from the squash, then slice into 1/2 inch crescents.


Toss with 2 tsp olive oil, and coarse sea salt and pepper, then arrange on a baking sheet, and roast for 35 to 45 minutes, turning every 10 to 15 minutes.  If the squash are browning too quickly, turn the heat down to 350.  Likewise, if they are not caramelizing, turn it up to 400.

Once the squash goes in the oven, throw all your vinaigrette ingredients into a mason or jam jar, shake vigorously, and leave to let the flavors meld while the magic happens in the oven.

Arrange the escarole leaves on a platter, top with warm Delicata squash, feta chunks, hazelnuts, and drizzle with vinaigrette.


Lovely.  We had our salad alongside some of Molly's Bouchons au Thon, from Orangette.

Happy Autumn Eats to you!

Sunday, October 23, 2011

Lesson Learned

Aloha, I'm back from Paradise.  That is, if your definition of Paradise involves working like a fiend, in order to be able to play and enjoy island living for a few precious hours.  I should explain the reason for our little jaunt to the tropics.  The Mister is a design engineer for a fancy-pants lighting firm, and they needed someone to go over to Waikiki to make (what we thought) was a minor, quick fix, to a mere 300 fixtures (300!), for a client (a poshy-posh 5-star resort).  Prior to this trip, my definition of Paradise had nothing whatsoever to do with work.  But well, life's a learning curve, and there was a definite lesson (or seven) learned on this trip.  I'll try not to make this a novel, but here are just a few lessons I learned:

Lesson Number One:  Waikiki does not feel like Paradise.  To me.  No offense to lovers of that place, but man.  I couldn't even cope with it.  It's packed with tourists, it's crazy expensive, and it's over the top glitz & glam.  If it was at all possible for Hello Kitty to mate with Liberace,  Waikiki would be their Love Child.  And where the hell did Rodeo Drive come from, by the way?  I've been to Hawaii three times before, but the last trip was about twelve (I think?) years back, and I'm pretty sure Fendi, Ferragamo, and Luis Vuitton were not on the scene back then.  Then again, I've never felt the need to put much time into Honolulu.  North Shore's where it's at, in this gal's humble opinion.

Lesson Number Two:  I do not want to live in Hawaii.  I used to dream of the day when I'd live there, in the way back when, Before-Time.  (Before the Mister, that is.)  And when the Mister and I were first together, we'd talk of moving there, someday.  Raising our little surf grommets to be the next world champs.  Inviting Kelly and Jack over for a barbecue.  Nothing fancy, mind you.  Just some friends, hanging out.  As you do.

Turns out, my imagination is awesome.  It gets the better of me rather often.  What's life without a dream or two, though?  (Answer:  boring, old Reality.  With a capital R.  Blech.)  The Mister and I called ourselves "Locals by Day, Tourists by Night" while on our little stint, as we worked with the lovely, friendly, but oh-so-not-in-a-rush Hawaiian hotel staff to complete a renovation, then meandered about in the evening, trying not to blow our entire stipend on one meal.  I can't even wrap my head around how hard you'd have to work there, in order to simply survive.  That kind of work is not for me.  More power to the locals though.  And I now get why they move on slow-mo-speed.

Lesson Number Three:  There's nothing like a good, home-cooked meal.  Especially when a fair to middling one just might put you in the poor-house.  I was all set to rock the local cuisine, did my research, and after seeing a rerun of No Reservations, where Anthony Bourdain, in all his sardonic glory, gets down with some Hawaiian food, I mapped out our meals.  Factor in exhaustion and long days spent working, and you'll get why I didn't quite make it as far as I intended on our food appreciation tour of Hawaii.  We did make it to Puka Dog, which was, um, well, hot dogs.  With a tasty choice of tropical sauces and relishes, it's true...but still, hot dogs, at the end of the day.  Had a gorgeous meal of locally caught sushi, and some delicious North Shore meals (when we finally managed to finish our work).  And we did try the plate lunch, a Hawaiian classic, super cheap and (kind of) cheerful food in a-freaking-bundance.  You could feed a family of four off of one plate lunch. Sadly, I did not so much enjoy it, though.  Oh, well.  Hard to find good vegetable dishes there, at least in wacky Waikiki.  It was pretty flattering to hear the Mister say, on the plane home, that he couldn't wait to eat some of my cooking.  Thanks, Mister.

And lastly, Lesson Number Four:  Home Sweet Home.  I missed the Kiddos like crazy.  I like my own bed, where the mattress has a nice, soft spot, just for me.  I love cooking meals in my wee kitchen.  And I dig going at my own pace.

We had a good time in Hawaii, here and there, though, I promise you that.  The Mister and I are not ones to go somewhere and not have fun, nor are we ones to look a gift horse in the mouth...even if we had to work our arses off for it.

The Mister did get to enjoy some decent, if not epic, waves...


I got to spend a wee bit of time relaxing on the beach, watching surf and sunset, and snapping shots...


All in all, not too shabby.  And I do so enjoy watching the surfers.  Especially my very own surfer.

But it's good to be home.

Saturday, October 15, 2011

Collaborative Effort

Wow, things have changed a bit since yesterday.  I believe it would be fair to say I was a bundle of stress yesterday morning, and then the Mister and I got some fun and surprising news:  We're off to Hawaii!  Tomorrow morning.  Work trip, but still...it's Hawaii, people!

So my focus has gone from "ack-get-the-cabin-ready-for-the-realtor-I'm-so-crap-I-can't-finish-sewing-a-garment!" to "Whatever, I'm off to Hawaii."  Guess who's not finishing the sewing I meant to?  This gal, that's right.

So, I'll be gone for a bit, but I do have a gorgeous recipe to share before I'm off.  And it's one of those cool, collaborative effort kind of recipes.  Our neighbors, avid mushroom gatherers, brought us some beautiful chanterelles the other day, check them out:


Yum.  Normally, I love wild mushrooms very simply prepared, a slow saute in butter & garlic, with some white wine, then served over toast.  But with the way the Kiddos eat these days, there weren't quite enough to feed the four of us, so I began to look around for a good recipe, and stumbled up a beaut at Smitten Kitchen.  Creamy White Polenta (aka grits) with Mushrooms.  Well, I don't have grits, but I do indeed have polenta, and I have been aching to try a trick I learned from another neighbor.  Matt, our New York-Italian turned Pacific Northwestern Brewer, was recently telling me about how his little Italian grandma always made the best polenta, because she zested a lemon into it.  You kind of have to trust an Italian on the subject of polenta, you know.  I wasn't quite sure whether I ought to zest it in at the beginning, or at the end, so I did a bit of both.

The polenta recipe I use is one I found on Orangette, which has resulted in the creamiest, most scrumptious polenta I've ever had the pleasure eating.  It involves cooking the polenta as normal, for about an hour, then holding it in a double boiler for at least half an hour, up to several hours (how great is that, being able to make polenta ahead of time?).  It takes on the loveliest texture from hanging out for a while, absolutely heavenly.  Go visit Orangette for that version, or use whichever recipe you're comfortable with.

Lemon Scented Polenta with Chanterelles - inspired by Smitten Kitchen and Matt's grandma
- feeds 4 as a main

Ingredients
cooked polenta (aka corn grits)
zest from one lemon
2 Tbs butter
grated parmiggiano reggiano

1 pound chanterelles
2 small, or 1 large, clove garlic
olive oil
3 Tbs butter
1/4 cup white wine
chopped parsley, for garnish
sea salt & freshly ground black pepper
juice from half a lemon

Prepare your polenta according to Molly's directions, or your own, but with this addition:  after stirring the polenta into the simmering water, and once the grains are beginning to absorb the water, zest in half the lemon.  At the end of cooking time, when you add the butter, add the zest from the other half of the lemon.  Cover with plastic and set over a double boiler for at least half an hour.


To prepare the chanterelles, leave smaller ones whole, slice in half or quarters medium to large sized mushrooms.  Put a tablespoon or so olive oil in a saute pan, over medium heat, then add the chanterelles and garlic, salt, and pepper.  Cook for six to eight minutes, until the juices are released, then cook out again.  Once the mushrooms are cooked through, but not slimy, throw in the wine, and let it cook down for a minute or so, over medium high heat.  Next add lemon juice, and butter, and simmer for a couple of minutes, so that a lovely sauce results.

Serve the chanterelles atop the polenta, with grated parmiggiano, and parsley as garnish.  Oh, joy.  The lemon in the mushrooms is perfectly in sync with the lemon hint in the polenta...so wonderful.


Quite a good collaboration, I must say.

I'll be back in a week, or so.  Have a great one! 

Friday, October 14, 2011

Take It Where I Can Get It

I'm feeling rather pulled in too many directions these days.  All the normal day to day work, school, household stuff, piled on to that the decision to put the cabin on the market (eek), piled on to that my insane notion to join in on this season's KCWC...

kcwc_button_fall_2011


Which sucks, because it's such a cool, and meaningful thing, sewing your kids' clothes, one teeny hour a day, for one measly, little week.  And I am having a major struggle with finding the time.  Also with finding the patience with these damn pants. 


I found the coolest tutorial on how to design your own pattern (which would be more useful to me if I could follow directions, and possessed the slightest inkling of precision), and the cutest pocketed pants, on Made.  And the coolest flannel-ish, houndstooth-ish fabric, for the Boy.  Alas, just when I thought I'd gotten things sorted, I realized I should have sewn those pockets on before I sewed the front and back together.  Damn.  How did I miss that?  I've kind of hit the wall here.  But I am at least (cross fingers) going to get a skirt for the Girl made before this week is out.  Sigh.  

Enough trials and tribulations, I do have a wee triumph for you.  Nothing monumentally earth-shattering, mind you.  Pretty sure I'm not up for any awards for this one.  But.  Considering how the week's going, I'll take it where I can get it.

Remember those delicious, homemade bagels we were eating recently?  Well, I've got a little veggie cream cheese for you.  Not rocket science, I know.  But it's good.

Here you go.

Veggie Cream Cheese - makes a bit over 8 oz

Ingredients
8 oz package of cream cheese, or neufchatel (the foil-wrapped kind, in the box), at room temperature
2 Tbs carrots, finely chopped
1 1/2 Tbs green pepper, finely chopped
1 1/2 Tbs celery, finely chopped
1 Tbs green onion, green parts only, finely chopped
pinch celery salt & freshly ground pepper


Toss everything into the food processor, and give it a whiz, until it's the consistency you like.  Mine is fairly smooth, with small chunks of veggies.  Taste for seasoning, then chill in the fridge for at least an hour.


How simple was that?  Thank goodness, I needed an easy one.

Have a good day.

Tuesday, October 11, 2011

Pure Goodness

So, I've been on a wee mission, of late.  One that is sure to sweeten life, just a bit.  Or my coffee, at the very least.

I wish I was one of those coffee purists, who can enjoy the depth of flavor with no added sweetness. Alas, I'm simply not.  The Mister's little Welsh Nain (that's Welsh for grandma) always said, when asked if she took sugar:  "I'm sweet enough already."  Every time, she said it.  Without fail.  In that awesome sing-song voice of hers.  I, however, am apparently lacking in inherent sweetness, and so must seek a little addition to my coffee.  Oh well, we all have our flaws, right?

Anyway, I noticed a while back that the coffee creamer I'd been buying, which I'm quite sure had originally been all natural, without any gross additions, now had artificial flavors, and the sugar had been supplanted by corn syrup.  Yuck.  I have to say, I got a mite indignant about that.  (Don't even get me started on those creamers with the mile-long lists of unpronounceable ingredients!)  And I stopped buying it for a while.  Tried my coffee with cream and sugar.  But I really missed the flavor (I was a vanilla girl, through and through).  The Mister, attempting to alleviate my concerns over fake food additives, suggested that since I had only a tablespoon or less a day, it probably wasn't that big a deal. And he was probably right.  But still.  On principal, people, I didn't want to give my money to that sneaky company any longer.

Well, that set those wheels a'spinning in my brain, and I realized, hey!  Why not make my own coffee creamer?  Surely, all I need is some simple syrup, steeped with a bit of flavor, and some cream, right? So, I determined to come up with my own, truly all-natural coffee creamer.

I tested and tweaked, first trying my go-to flavor, of vanilla, combined with a simple syrup, made of equal parts sugar and water.  But, the syrup was too thin, and because I used vanilla essence, it wasn't quite right.  (I struggle with justifying the expense of vanilla beans sometimes.  Oh, they're lovely. And so bloody expensive!) Then, I tested and tweaked a bit more, until Voila!  I hit upon a darn tasty recipe, that is pure goodness.  Autumn inspired me a bit, seeing all those warming spices coming out: cinnamon, allspice, cloves...and yep, a little vanilla.

Here it is:


Lightly Spiced Coffee Creamer

Ingredients
1 1/2 cups sugar*
1 cup water
1 cinnamon stick
1 tsp allspice berries
3 or 4 cloves
1 tsp vanilla essence, or half a vanilla bean, cut lengthwise
cream

*I use organic sugar, which makes my simple syrup a light brown color.  Regular granulated sugar will result in a clearer syrup.*

In a small saucepan, place sugar, water, and spices, over low heat.  Allow to steep for about half an hour, stirring from time to time.  When the flavor is at the right intensity for you (mine was rather subtle, I didn't want to be hit over the head by it), turn the heat up and allow the simple syrup to simmer gently for about 5 minutes, until the sugar is dissolved fully, and the syrup thickens.  It should be nearly, but not quite, the consistency of honey, or thick maple syrup.  Remove from the heat, fish out the spices, and allow to cool completely.

I store the simple syrup in a jam jar in the fridge, and mix it with the cream as I need it, since the cream will go off well before the syrup will.  For guests, I mix up one part simple syrup to two parts cream, in another jam jar, give it a shake, and it's good to go.

Pure Goodness.


Sunday, October 9, 2011

Pants on Fire

Listen.  I am not about to call myself a liar here.  When I'm busy shouting this or that bit of information from the rooftops, I mean it.  At least at that moment.  However, as I was whipping up a little something for dinner last night, I realized that I smelled smoke.  Coming from behind me!  Holy smokes!  My pants were on fire!

Just kidding.  They weren't.  But, if you'll happen to have read a recent post of mine regarding coleslaw, wherein I make a few somewhat long-winded and rather vehement claims...well, suffice it to say, that I caught myself out yesterday evening.  I was not sticking to my tried-and-true coleslaw.  In defense of myself though, I had no other option!  The slow roasted pork shoulder was slowly roasting away in the oven.  The dough for rolls had just gone into the bread machine. When, to my dismay, I realized there was only red cabbage in my veg drawer.  Uh-oh.  Can't really have pulled pork sandwiches without a slaw of some sort, can we?  (No, we can't.)  So, I dug around a bit, pulled out a fennel bulb, and a braeburn apple, and decided to hell with it.  I'm going to prove myself a teensy, weensy bit of a liar.

Just smell those house-fit pants, smoking away...Yowza.


Also, let me just say:  this coleslaw does still fall within my parameters of what constitutes a good slaw.  Crazy (and subjective) as those parameters may be.  That being the simple combination of salty, sweet, creamy, and tart.  The crunch of the bright purple cabbage, mated with the tart apples, and the anise-flavored fennel...it works.  I used light brown sugar in the dressing, because I figured it would pair nicely with those apples.  And, as I was reaching for the cider vinegar, which would be aptly suited, my eyes fell on Monica's homemade tarragon-infused vinegar.  Oh, that's the ticket.  If you don't happen to have tarragon vinegar in your pantry, or a Monica of your very own, white wine or apple cider vinegar will do just fine. 

Here you go:

Fennel, Apple, and Red Cabbage Slaw - serves 8, as a side

Ingredients
1 small, or half a large, head red cabbage, cored, and thinly sliced
1 tart apple, thinly sliced
1 fennel bulb, stalk and fronds removed, and thinly sliced

Dressing Ingredients
1/2 cup mayonnaise
2 Tbs light brown sugar
3 Tbs tarragon vinegar, or cider, or white wine vinegar
1/2 tsp sea salt
freshly ground black pepper

In a small bowl, whisk the dressing ingredients together. 


Spoon the dressing over the fruit and veg, in a large bowl, and toss to combine.  Allow to hang out, in the fridge, for at least an hour or two before serving.  This will keep for up to two days.


Yum.  Nothing wrong with mixing things up.

Now to put this fire out...


Cheap & Cheerful

A feature where I share a good deal I happen upon...be it wine, food, or just something fun...If you have something Cheap & Cheerful you'd like to share, leave a link or suggestion in the Comments section at the end of this post!  Enjoy!

So, this time it's not a food item.  Nor is it wine.  Nope.  Undeniably related to food, though...


Check these nifty little guys out.  I found these reusable mesh bags, made by Earthwise, at Fred Meyer, recently.  And, get this:  $1.99!  For a pack of three!  Sweet deal, right?


I've been using them for a couple of weeks, and totally loving them.  They're breathable, and I don't know much about the science behind my claim here, but the produce contained in them seems to stay lovely and fresh, just a little bit longer. 


Oh, and washable too!  How nice to know these are out there, and imminently affordable.  One less thing heading to the landfill, right?


Have a great day!

Wednesday, October 5, 2011

Out of the Box, Take 8

Before you roll your eyes at the fact that I'm about to deliver another tomato recipe...let me tease you with this one:  there's vodka involved.  And it's not a beverage.  Piqued your interest, have I?


I had a nice stash of cherry tomatoes from our CSA box, and a brunch coming up, what to do?  Ah...the mind instantly heads to Monica's for inspiration, which is where I first tasted these Cheeky Tomatoes.  Monica, the hipster queen of all that is edible, or drinkable.  So, of course she would discover this recipe, which unites two very enjoyable activities:  Eating and Drinking.  How can you possibly go wrong?

Originally, the recipe comes from Gourmet, but Monica found it on epicurious (how I love that site!).  I shortened the moniker to Cheeky Tomatoes, but it's actually:  Vodka-Spiked Cherry Tomatoes with Pepper Salt.  Try saying that with a mouthful of vodka soaked tomatoes.  Not easy.

These are perfect, perfect, perfect for brunch.  May I suggest accompanying these with Bloody Mary's?  And, may I also suggest, once you've polished off those Cheeky Tomatoes, throwing the marinade into a batch of Bloody Mary's?  Oh, yum.  That'll do the trick.

Here you go:

Vodka-Spiked Cherry Tomatoes with Pepper Salt or Cheeky Tomatoes - adapted from Gourmet

Ingredients
3 pints firm, small cherry tomatoes
1/2 cup vodka
3 Tbs white-wine vinegar*
1 Tbs superfine sugar**
1 tsp grated lemon zest
3 Tbs kosher salt
1 1/2 Tbs freshly ground black pepper

*Monica had made me, as a lovely birthday gift, some tarragon-infused vinegar, which is what I used.  Scrumptious.*
**If you don't have superfine sugar, also called caster sugar, give your regular granulated sugar a quick whiz in the food processor.**

Whisk the vodka, vinegar, sugar, and lemon zest together in a medium-sized bowl.  In a very small bowl, something ramekin-sized, mix the salt and pepper.  This will be served alongside the tomatoes, to dip into.

Okay, so the original recipe asks that you blanch and peel all those tiny tomatoes.  Balls on that.  Monica didn't do it, and neither did I.  Plus, I think the staying power of your tomatoes will be significantly longer if you don't peel them.  Up to you, though.  What Monica did, was to pierce each tomato a few times, with a toothpick, so that they still soak up the marinade, yet hold their shape.  (And you're doing a lot less fiddly work.)  I, however, found myself lacking in the toothpick department (I know, shocking, right?), so I was forced to improvise:


Pretty ingenious, if I do say so myself.  And somewhat apropos.  At least in my head.  Anyway...

Give each tomato a few piercings, and toss them into the marinade.  Allow to hang out for at least half an hour before serving.  If you've simply pierced them, as I did, they'll be good to go for a solid few hours.  If you've peeled them, you're probably looking at an hour or hour and a half.  And who wants to put that kind of pressure on guests?


Serve them up, in all their gorgeous, cheeky glory, with the Pepper Salt set on the side, for dipping into.  Edible Bloody Mary's.  (Don't forget to use that marinade in a last batch of Mary's, now!)


Oh, yeah...might want to not have these in reach of the little ones.  :)

Have a great day!

Tuesday, October 4, 2011

Bagels

Alright, folks.  Today's recipe is a serious treat.  One that I wish I'd discovered years ago...because just think of all the time I've done without this one.  The very thought fills me with sadness.

Okay, kidding.  Little flair for the dramatic there.

Here's what we're making today:


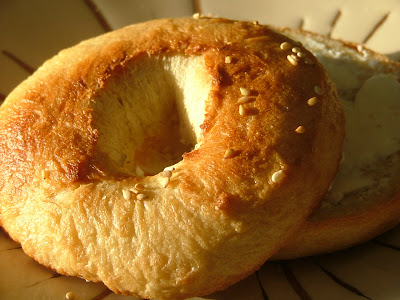
Homemade Bagels.  With our trusty bread machine.  And Oh.  My.  Word.  These are actually bagels. These are not glorified rolls with holes in the center, that we're optimistically dubbing bagels. The texture is spot-on.  Just the perfect density; lovely and chewy on the inside, crusty on the outside.  I am beside myself about these bagels, truly.

I can't help but lament the fact that I didn't discover this recipe years ago, back when we lived in New Zealand.  There I was, heavily pregnant, and I mean heavily, largely, huuuuugely pregnant, overcome by an obscene craving for bagels.  And no bagels to be had.  That's rough, people.  I tried to make my own, with a recipe or two, with no success.  Those fetal cravings went unmet.  Tragic, I know.  But now, I've got it.  And if any of you are experiencing similarly overwhelming bagel lust, and dwelling in a bagel-free zone, have no fear.  I'm here to help.

This recipe comes from Rustic European Breads from your Bread Machine.  A massive find I happened upon at the library, and now absolutely must own.  Every recipe I've tried from this book has turned out great.  That doesn't usually happen with breadmaking books.  At least not in my twisted little world.

Bagels - adapted from Rustic European Breads
 - makes 8 bagels

Ingredients
1 1/3 cups warm water
3 tsp kosher salt
3 Tbs sugar
4 tsp bread machine yeast (I use Red Star Active Dry Yeast, not bread machine, and it's perfect)
3 1/2 cups bread flour

2 quarts boiling water
2 Tbs malt syrup *

* The recipe states, emphatically, to use malt syrup, no substitutions.  I, however, tend to chafe at rigid instruction, so of course I substituted...because of course, I had no malt syrup.  I used 1 Tbs maple syrup, and they were lovely.  Do what you feel is right.  Follow the rules.  Or rebel a little.  Your choice.*

Place the ingredients (except boiling water, and malt syrup) in your bread machine pan according to your machine's instructions.  Set for the dough cycle, if you have it.  Otherwise, just let the machine do the kneading work for you, stop the cycle, and leave the dough to rise for one hour.

Toward the end of the rising time, bring a large pot of water, with the syrup, to a boil, and preheat the oven to 425 deg F.  Lightly grease a large cookie sheet, and sprinkle with cornmeal.

When the dough is finished rising, turn it out onto a lightly floured board, and knead a couple of times to deflate any air bubbles.  Evenly divide the dough into 8 equal pieces.  (I use my dough scraper and cut the dough in half, then each half in half again, etc.  Equal parts, easy peasy.)  Roll each piece of dough into a ball, and flatten slightly.  With your thumb, or fingers, poke a hole through the middle of the ball.  Pull and stretch the dough until it's roughly donut-sized.  The dough will pull back in a bit, so stretch it a little larger than you'd like the final product to be.


Adjust the heat under the boiling water to a low boil.  Gently drop 4 bagels into the water, and allow to boil for 30 seconds.  Using a skimmer, or slotted spoon, flip them over and boil for another 30 seconds.  Remove and drain on a clean towel, while you boil the other 4 bagels.


Place the drained bagels on the baking sheet, and bake in the preheated oven for 11 minutes.  Working quickly, remove the sheet from the oven, flip the bagels over, and bake for another 11 minutes.  This is key to the crust-to-chew ratio, as the recipe states.  And I did listen on this one.

After 22 minutes, the bagels will be lightly browned and shiny.  If not, continue baking for another minute or so, but watch carefully so they don't burn.  Cool for at least 10 minutes on a rack.


Gorgeous, aren't they?  These are best eaten the day they're made (obviously), but will keep in a plastic bag for a day or two.  Keep it simple and serve with some cream cheese, or make it more of a meal with some smoked salmon, or fresh veggies.  Yum.


I'm looking forward to trying a few adaptations on this recipe this weekend, for brunch.  And I'm going to be testing my claim of authenticity on East Coasters...New Yorkers, in fact.  I'll let you know how it goes.

Go make some bagels!

Monday, October 3, 2011

Up for a Challenge?

I've been wanting to join in on this one for a few goes...but tend to fear committing to a project, especially publicly.  But, looks like I'm up for a challenge.  Mostly.


It's the Kids' Clothes Week Challenge, on Elsie Marley, next week.  The gist of it being, spend one hour a day, for that week, making something for your kids to wear.  Pretty cool, right?  Are my skills up to it?  Hopefully.  Patience?  Mayyyyybe...  Commitment?  Um...well, it is a challenge, after all.

Now I just have to decide what to make...

Leave a comment and let me know if you're joining in.  (And maybe a few words of encouragement!)