"Things won are done,
Joy's Soul lies in the Doing."
- William Shakespeare

Wednesday, September 26, 2012

Eating Outside the Box, Take 4

This season' CSA delivery is drawing to a close, as Fall is upon us.  Only three more weeks of bountiful, organic produce remain.  (Only three more weeks of less time spent in grocery stores, too, sadly.)  Gazing upon the bright orange and gold vegetables so fitting this season, I once again sought dinner inspiration from Nigel Slater's Tender.


With a plenitude of snappy carrots and golden beets, I chose Mr. Slater's recipe for "a salad of carrot thinnings" as my springboard.  The recipe is actually for those tiny, tender spring carrots, and miniature beets.  Mine were large, and very autumnal.  And I don't think Mr. Slater would mind my adaptations one bit.

Away we go:


A Warm Salad of Carrots and Golden Beets - adapted from Tender
 - serves 4 to 6 as a side

Ingredients
1 bunch carrots, about 1 pound, peeled, and cut into sticks
3 medium to large golden beets, peeled, and sliced into rounds
1 clove garlic, minced
1 Tbs red wine vinegar
1 Tbs freshly squeezed lemon juice
3 or 4 Tbs olive oil
handful of fresh herbs, chopped - I used dill and parsley, the recipe calls for cilantro, use what's on hand
sea salt and freshly ground black pepper

You may either boil or steam your veggies, depending on your preference, and their size.  If you're making this as it's originally intended, with wee spring vegetables, steaming would work best.  (In this case, leave small beets whole.)  If, as I did, you're using larger, autumn veg, it may be more prudent to boil them.  Boil the beets first until just barely fork tender, with a bit of a snap remaining to them.  Remove from the pot with a slotted spoon and set in a colander to drain.  Cook your carrots for a minute or two, just to take the raw edge off, and drain.

While the carrots cook, slice your beet rounds into sticks, similar in size to the carrots.

In a medium mixing bowl, whisk your vinegar, lemon juice, garlic, salt and pepper, then drizzle in your oil, whisking to combine.  Toss in the vegetables, stir to coat in the dressing, and add your fresh herbs.  Serve warm or at room temperature.


This salad keeps nicely for a day in the fridge, and is lovely for lunch the next day.

Happy Autumn to you!

Tuesday, September 18, 2012

The Peace of Bread

I seem to be in a bit of a blogging funk these days.  Here's a few snapshots of what's been going down around here:

Pool parties with the cousins...


The Boy, off to 5th Grade Camp, reveling in his ever-growing independence, while I look on, proudly, with just a hint of sadness that it's happening oh-so-quickly...


The Girl, also reveling in her own way, making me smile at her funky fashion sense...


While I, in all truth, must admit to feeling just a bit lost these days.  For the past ten plus years, I've had my main focus centered on caring for the kiddos, both mine, and my niece and nephew.  Now that they're back in school, and my niece and nephew have moved, I find myself with a very large chunk of time on my hands, and a little at a loss as to what to do with myself.  Adding to this parenting milestone, plus a gimp ankle that keeps me kind of stuck, our supposedly short stint renting a home while we wait for our new house to close, has grown to what feels like epic proportions of  six months.  This untethered, unsettled sense of existence lingers throughout my day, while I look for new ways to define myself, and to be useful, while waiting the interminable wait to be making my own home again.

Knitting, of course, tends to take the edge off...


...but not entirely, by any means.

And so, I've been baking bread.


There is undeniable peace to be had in baking bread.  Particularly when it turns out so very heavenly.  It's not exactly filling the gap entirely, of giving me a solid sense of purpose, but it does give me a mission of sorts.

I haven't given up my bread machine, mind you.  That baby is still too much a gem in my eyes, and kneading still feels like too much work to me.  But I have been turning out some seriously good loaves these days.  It's a bit of a time commitment, working with a poolish, a French-style overnight sponge to add depth and texture, but hey, time is something I have in abundance right now.

This loaf is based on the classic French Pain de Campagne, with a marvelously thick, crusty exterior, and beautiful holey, slightly sour interior.  It's everything bread should be, even if I do cheat a bit with my machine.  I will say that I was rather hesitant to share the recipe, as words seem insufficient to describe a process that is actually quite instinctive.  In the end, though, I've decided that it's just too good not to share. 

Before I share the recipe, I'll also suggest that it helps to have either some experience working with wet dough, or at the very least, the confidence to trust that with a bit of practice, it will work out.  I flour my board liberally, and I do mean liberally, when shaping the loaf, and rely heavily on my dough scraper to help move it from board to baking sheet.  There is a balance though, between using flour to prevent the dough from sticking to the board, and actually adding more flour to the dough, which will result in a heavy, unlovely loaf...with none of those gorgeous holes.  Wet dough is essential, to the point of almost sloppy, and you'll need to wash your hands a few times while shaping.  It's well worth the work.

Here we go:

Pain de Campagne - adapted from Rustic European Breads
-makes one large boule

We'll start by making the poolish in the bread machine, the night before.

Poolish Ingredients
3/4 cup organic bread flour*
1/2 tsp yeast**
1/2 cup room temperature spring water***

*Organic flour is called for, as it hasn't been chemically treated.  Those chemicals interfere with the natural rising processes called for in this bread.  I have successfully used non-organic flour, in which case, I add an extra half teaspoon of yeast, to the dough, just to be safe.  (Not to the poolish.)

**You can use either bread machine yeast, which doesn't need proofing.  Or, if you like to buy a large quantity and can only find it as active dry yeast, you'll need to proof it, in order to get it working.  Simply add the water and yeast to the bread machine pan, and wait about 10 minutes, until the yeast dissolves and begins to look a little frothy.

***If your water is city tap water, it's most likely chlorinated, which also interferes with yeast.  You can use bottled water, if you like.  (I don't like.)  Or you can use filtered water, if you have a filter.  Or you can simply leave your tap water out during the day, or the night before, and the chlorine somehow miraculously goes away.  (Don't ask me, I'm not a scientist, I just read a lot.)

After having read the above notes, place your ingredients in the bread machine pan, proofing your yeast if necessary, and set it to the dough cycle.  Go to bed, confident that the poolish is doing its thing.

Next, we'll start our dough.  If you're unable to start your bread the next morning, never fear, just pop the poolish into a covered container, and refrigerate it, and bring it back to room temperature once you're ready for it.  It'll be fine for a day or so, and it'll add even more flavor to your finished bread.

Pain de Campagne Ingredients

1 tsp yeast** (see above note on yeast)
1 cup whole wheat flour
1/2 cup rye flour
2 cups bread flour
1 Tbs sea salt
1 cup plain yogurt, at room temperature (I've used it straight from the fridge, with no problems.)
1 cup water
poolish from the night before, about 1/2 a cup (I use the whole lot from the previous recipe)

To the poolish in the bread machine, add your yeast, yogurt, and water. Allow the yeast to proof, if using active dry yeast.

Add the flours and salt, and set the machine to the dough cycle.  Once complete, dump the dough on to a heavily floured board, and have your dough scraper ready, and your hands well floured.  (If for some reason, life gets in the way of you completing the loaf right now, simply place the dough in a large, covered container and refrigerate it until you have time to rise and bake.  It'll be just fine, and actually benefits from the rest.  You must allow space in the container because the dough will still rise somewhat, initially, in the fridge.)  Use the dough scraper to slide under the bread, while shaping your dough into a boule, or round.  See my notes from another loaf on how to do this, here.)  You should have a little something like this:


Dust the top of the dough with flour, and around it, then cover with a plastic garbage bag, and leave to rise in a draft-free place, until approximately doubled in size.  You'll know your dough is fully risen when you gently prod it with a finger, and it doesn't immediately spring back, but rather leaves an impression, then slowly goes back to its original shape.  If you're not sure you'll be able to move your risen loaf (it is large, and takes a bit of finesse that comes with practice), you can move it before its rise, to a baking sheet covered in parchment paper.  I don't do this, but it may be easier if you're just getting the hang of things.

Check on your bread from time to time, it can take anywhere from an hour, to much longer, depending on room temperature and how active your yeast is, to be ready.  You'll want to preheat your oven to 450 deg F, for about half an hour before baking, with your baking sheet in the oven.  (Unless you've chosen to raise your dough on the sheet.)  I turn the oven on when the finger prod is still springing back at me, but not quite as quickly.  Again, the more often you do this, the easier it becomes.

Just before baking, place near the oven:  oven mitts or potholders, a sharp serrated knife or razor blade, a water mister (just the cheapy plastic sprayer kind, if you have it, if not, don't worry about it), and your dough scraper.  Sprinkle cornmeal on your baking sheet.  Flour your hands, and using the dough scraper, gently loosen the dough from the board and very carefully move to the preheated baking sheet.  Working quickly, and with confidence, slash the dough about 1/2 an inch deep, in a cross over the top of the dough, and place it in the oven, misting with water.

Set the timer to 20 minutes, then rotate the pan 180 degrees, and cook for another 20 minutes.  My bread takes about 50 to 55 minutes to fully bake, but it's best to check it after about 40 minutes or so.  To do this, flip the bread over, and thump it with your knuckles on the base.  If it's done cooking, it'll sound hollow and deep.  (Again, with the practice, you'll get this.)  The crust will look quite dark, well before it's done, and that's a good thing.

Once the bread is done, remove it to a cooling rack, and cool it for at least 30 minutes, if you can wait that long.  It's hard, believe me, when you have that beautiful loaf sitting there, all sorts of pride filling your heart at what you just made, from scratch, and a lovely aroma wafting about the kitchen.  But resist the temptation to slice it, to allow the bread to finish its work.  (Plus you don't want all that time and effort to result in a smushed, gummy loaf.)

Now, cut into that baby, and enjoy.


There is definite peace of mind to be found in baking bread, and with time, the entire process becomes almost second nature, from start to finish.

Check out what I've got going for my next bread mission:


A science project of sorts, cultivating wild yeast from wild plums and apples, to create my own sourdough starter.  And I do believe it's working, people.  I'll keep you posted.

Have a beautiful day.


Thursday, September 6, 2012

Eating Outside the Box - Take 3

Often it's tricky to come up with something inspiring for dinner...or something inspired to write about here.  Given that pretty much everything has been done, and that I'm no chef, most of what I make comes from either recipes I find, another cook's meals I try to recreate, or a classic dish, to which I add a little twist.  To be honest, even those twists may be somewhat unoriginal, who knows?  If it requires googling for hours, I'm going to put it in the who cares? box.  And then eat. 

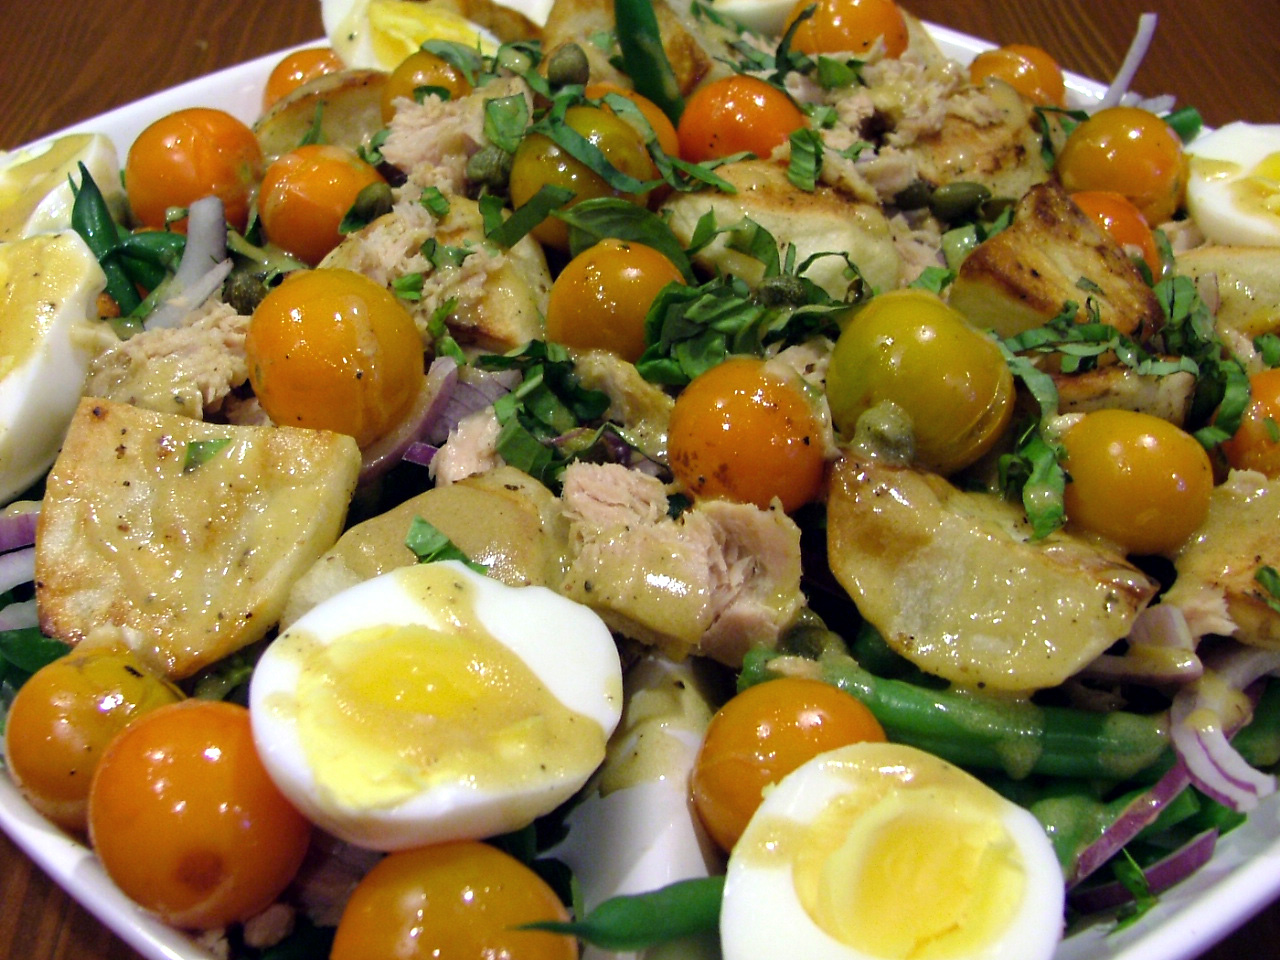
In this case, the classic is a pretty serious classic, indeed. Salade Niçoise, that quintessentially French salad:  haricot verts, potatoes, capers, olives, hard boiled eggs, and tuna.  How much tweaking can we even do here?  Is it even necessary?  Well, that old chestnut, necessity being the mother of invention, answers the question:  Yes.  Sometimes we must tweak, and twist, and revise, so that we satisfy ourselves, and work with what we've got.  (ie - not running to the grocery store for one or two supposedly required ingredients)  I had a gorgeous load of veggies from this week's CSA, thanks to Helsing Junction.  Bag the market, I love my CSA box.

As I was attempting to feed my gang yet another salad, without them exactly knowing it was yet another salad...I decided to go for the Salade Niçoise.  It's filling, it's delicious, it hits a nice number of food groups.  One problem:  I only had russet potatoes, which simply wouldn't do to replace boiled baby potatoes, as the recipe calls for.  Boiled russets?  Blech.  So, I roasted them.  In bacon drippings.  And then, I roasted my cherry tomatoes.  Also in bacon drippings.  Oh, hell yeah.

Let's do this.


Roasted Salade Niçoise
 - serves 4 as a main

Ingredients
4 medium russet potatoes (or any sort will do), peeled and quartered (if small potatoes are used, leave whole, or halve, and don't peel)
1/2 red onion, sliced
few handfuls cherry tomatoes
4 eggs
1 lb green beans, blanched for 2 minutes, then chilled
2 Tbs capers, rinsed
1 tin of tuna, packed in olive oil
handful niçoise olives, or any other salty, meaty olive
handful basil leaves
Tbs or so bacon drippings, melted*

*  I keep bacon drippings in a jar in the fridge, for just this sort of thing.  I used to think it sounded gross, but it's the sort of cooking that's been around for centuries - using what you've got.  And it is damn good, believe me.  (Don't save drippings that are burnt, or have lots of little bits in them.)

Vinaigrette Ingredients
dijon mustard (I love Maille)
red wine vinager
good olive oil
garlic clove, crushed OR small shallot, minced
sea salt & freshly ground black pepper
small amount of honey

Preheat oven to 425 deg F.  On a rimmed baking sheet, toss the potatoes in the bacon drippings, and season with sea salt and freshly ground pepper.  Roast until golden brown on the bottom, then turn, and continue roasting until done.  This takes anywhere from 25 to 40 minutes, usually.  Since you'll be eating the salad warm, it's not super important that everything gets plated as it finishes cooking.  So relax.  Roast these first, and you'll be golden.

While the potatoes are roasting, arrange the blanched green beans on a large platter.  Open your tuna and drain off the oil.  Place eggs in a saucepan with enough cold water to cover them by an inch.  Bring to a boil, over high heat, lid on the pan.  Once the water boils, remove the lid, turn the heat down slightly, and set the timer to 6 minutes.  You may need to adjust the heat to keep it at a gentle boil.  Drain and rinse under cold water, then peel when cool enough to handle.  Slice in half.  No grey yolks - perfectly yellow, creamy goodness.  (And that stinky sulfur smell?  Not so much.)

Make the vinaigrette.  It's true, I didn't include exact amounts.  I find exact amounts too restricting, and I feel like a massive hypocrite when I give them to you fine folks.  The accepted rule is to use a one to three ratio of vinager to oil.  I tend to prefer my vinaigrette a little heftier on the acid though.  And I dig some dijon, which may not be true of everyone.  Just taste as you go.  A vinaigrette is virtually impossible to mess up.  If it's too much of one thing, you simply add more of another to balance the flavors.  If you end up with too much dressing, you've got leftovers to store for tomorrow.  This is not a problem.

Right, begin the vinaigrette by whisking together all the ingredients, except olive oil and honey.  Once they're combined, drizzle in the oil, whisking, until it's emulsified.  Taste as you go.  Add a small amount of honey, and whisk again.

Once the potatoes are nearly done roasting, throw the cherry tomatoes in the pan with them, and give them a little toss, to coat in the bacon drippings, of which there should be ample in the pan.  Season with salt and pepper, and roast for around 5 minutes, until the tomatoes begin to split their skins.


Arrange the potatoes over the green beans, and top with the rest of the salad ingredients.  Chiffonade your basil, and throw that over, then drizzle on the vinaigrette.


There are a lot of different elements to this salad, but you can prep some (green beans, onions, eggs, vinaigrette) ahead of time, if you like.  And it is so tasty.

I'm thinking roasting the onions and green beans wouldn't be such a bad idea either...hmmm.

Have a fantastic day!

Wednesday, August 29, 2012

Back to It

It hasn't all gone exactly according to plan.  At least not to any plan I had concocted in this head of mine.  I had envisioned being moved into our new Island home by now, being immersed in painting, unpacking, decorating, and planning a fall garden.  I was certain we'd have the kids begin the school year at their new school.  Alas, none of this has come to pass.  We've missed two closing dates on the house, and are coming up on our third, which will undeniably result in yet another delay.  Painting, decorating, and garden-planning still exist only in my mind.  But...there is a bright side...


These kiddos just hopped on the bus this very morning, off to school.  Their old school, of course, as we're not yet moved.  This is a mixed blessing, because while they're happy to spend time in a familiar place, with familiar friends and teachers, for a bit longer, we will have to transfer them.  Soon, hopefully.  And, being a parent of the worried-mum variety, I fear it'll be much harder on them, than it would have been to start anew at the beginning of the school year.  They're flexible little people though, so I'm sure it'll all work out in the end.  If only we had any inkling of when that "end" was to be.

Happily, though, they are well ready to start school...and I'm not too proud to admit, I am well ready for them to get back to it.  And on that note, let's have a little celebratory toast, shall we?

Remember that blueberry vodka I began a couple weeks ago?

It went from this...


...to this...


Here's how I made it:

Blueberry Vodka

Ingredients
3 cups fresh blueberries, rinsed, stems and soft berries picked out
400 ml vodka

I used two old juice jars, and split the berries and vodka between them.  Leave to infuse in a cool, dark place, such as a cupboard, for 2 weeks, shaking daily.  The blueberries will gradually lose their color, and the vodka will turn a gorgeous magenta.  At the end of the two weeks, strain out the blueberries, and store the vodka in the fridge.

It tastes absolutely lovely.  If you're a martini sort of drinker, this would be divine shaken with ice, and served with a twist for garnish.  Or, if martinis aren't your bag, let's mix up a little blueberry lemonade...


Blueberry Lemonade

1 to 2 oz blueberry vodka, depending on how strong you like it (or need it)
lemonade, either freshly made, or I like Newman's Own, or Simply Lemonade, 6 (or so) oz

(Note - limeade is delicious here too!)

In a shaker full of ice, combine your vodka, and lemonade, and shake vigorously.  Pour into a glass, over ice, and enjoy.


Here's to Back to School!  And to making it through another busy summer.  Well done, my friends.  Well done.

Given that it's still morning though, we may want to wait just a wee while before cocktail hour...

Tuesday, August 21, 2012

The Good, The Bad, and The Ugly

It's a mixed bag around here these days.  A veritable roller coaster of ups and downs.  I am attempting to ride with grace, but fear I may not be so successful in my goal.

The Good...nay, The Great:  I had the very immense honor of being doula to the beautiful goddess I call friend, last week. 


I do believe that the sheer joy with which this lovely boy has been welcomed into the world will get me through The Bad, and The Ugly.


He's absolutely perfect.

I feel a little guilty following that marvelous-ness with The Bad, but here we are.  We're mired in a bog of waiting, right now.  The house that we made an offer on two months ago, have spent countless hours dreaming about, and planning for, is an exercise in patience.  Unfortunately for me, patience is not a virtue I possess in abundance.  We did have fair warning that buying a bank-owned property is at best, a frustrating endeavor; at worst, a soul-destroying act of futility.  Perhaps I am a little heavy on the drama, but it is proving tricky to keep up good spirits while waiting on faceless (useless) bankers to get the freaking job done.  At the end of the day, I know we'll be grateful for having stuck it out, for this place is well worth it (I keep telling myself).  In the meantime, I'll continue impotently shaking my fist and cursing at those incompetents who seem to hold our lives in their greedy, dawdling hands.

And I'll take another gander at that wee boy up there.  Ah.  That's better.

The Ugly:  While our home-buying limps painfully along, I too limp my way through the day, rocking one of these beasts:


My innate clumsiness is a bit of an ongoing joke with those who know me.  In my defense, I had a good run - a couple of years! - with no major injuries.  One little stumble off a deck, and there we have it.  Damned inconvenient.  Lucky for me the 90+ degree days have spent themselves.  Always a silver lining, isn't there?

Let's hit The Good again, shall we?  Recall those blueberries we hoarded a wee while ago?  


They have turned into some delicious treats.  One of them being this blueberry jam:


The recipe is from, once again, Food in Jars.  And once again, it absolutely rocks.  Bright, a tiny bit tart, with a hint of cinnamon...it is something else, I tell you.  And scrumptious spread on bread with a little bit of sharp cheddar.  Stop by Food in Jars, and make some, recipe here.

Last, and with impeccable timing, I've got this to look forward to:


That there is my blueberry vodka.  It's been infusing for about a week and a half.  It's meant to hang out for about 2 weeks, but I'm thinking, with this crazy roller coaster ride, I may just have to sample some.  ASAP.  Don't you think?

I'll let you know how it goes.  And I'll share the recipe soon.

May your day be filled with nothing but Good.

Wednesday, August 15, 2012

Beat the Heat

This foraging business is some fun, I tell you.  The kiddos and I hit up the nearby blackberry bushes, and scored a number of tasty treats.  Along with a number of scratches from thorns.  But it's well worth it.


I had plans to make a black and blue crumble, but it was far too hot to turn on the oven.  And so, after freezing a load of berries to save for the days ahead, I turned to David Lebovitz's The Perfect Scoop, and got to work on a blackberry sorbet with my remaining fresh berries.  Oh my, yes.


This couldn't be simpler, as far as making your own ice cream goes.  No egg yolks to temper for a custard, no messing about infusing flavor into cream.  Just a quick whiz in the blender, a while spent chilling, and a turn in your ice cream maker.

Here you go:

Blackberry Sorbet - adapted from The Perfect Scoop
- makes one quart

Ingredients
4 cups blackberries
1 cup water
2/3 cup sugar
2 tsp freshly squeezed lemon juice

Pureé the berries in a blender with the water and sugar.  Press the mixture through a sieve to remove the seeds, stir in the lemon juice, then chill thoroughly.  I popped mine in the fridge for a couple of hours.

Freeze the chilled mixture in your ice cream maker, according to the manufacturer's directions.  It will be somewhat soft, and quite lovely, served immediately, or you can pop it in the freezer for an hour or two if you'd like it more frozen.

Absolutely gorgeous, and the best way to beat the heat.

Have a beautiful day.

Monday, August 13, 2012

Picking


For the first time, since we've been back in the States (7 years!), I've actually made it to the blueberry farm.  Every year, I've had the best of intentions, and every year, I've missed those blues.  Not this year, my friends.  On Friday, M and the Kiddos and I picked our hearts out.


This picking business is addictive, I tell you.  Long past the point where the Kiddos gave up, and sat on the grass, nibbling their haul and playing with ladybugs, M and I picked.  And picked.  And then picked a bit more.  It was nearly impossible to stop.  Each new cache of plump, juicy berries discovered urged us to keep on picking.  With the sun gently warming the berries, the mountains standing sentinel in the background, we managed quite a load.


Forty pounds between us, to be exact.  That's a lot of blueberries.

So now, we've got blueberry jam in the cupboard, blues in the freezer, a blueberry chocolate pavlova birthday cake, blueberry vodka on the go:


...and a blueberry crumble, a la local kitchen, which was devoured.


Should you be in possession of some gorgeous, ripe blues, you'd really best get on over to local kitchen for the recipe.  It's incredibly simple to prepare, foolproof really, and get this:  I am not a baked fruit girl...and I loved it.  This new-found respect for baked fruit could have something to do with the fact that we picked it ourselves.  Or it could just be an outstanding recipe.  Either way, it begs to be made and enjoyed.

And today?  Guess what the Kiddos and I are picking...


Blackberries.  And the best bit...they're free, and a short bike ride away.


I'm sensing a black and blue crumble for dessert tonight, using the above recipe as guide.

Enjoy the sunshine today!